Home
March 2021 - Charlie's VFO
... and other Arduino projects.
One of the consistently great source of building ideas to be found in the QRP world is from Charlie Morris ZL2CTM. Charlie currently has (way over) half a million views of his many videos. Aside from showing you how he physically builds his projects, he will often shows the mathematics that contributes to the choosing of components.

One of the component choices he often makes is to use the Si5351 for his VFO's - and at the heart of that is the ubiquitous Arduino
The Arduino is a source of frustration for some home constructors because the Arduino IDE doesn't always play nicely - or even behave the same in different PC environments.
There are as many different
Windows configurations as there are constructors. No two being quite
the same. All have had different software installed at some point.
A designer will have a project that works
perfectly in his shack - but the arduino sketch could (through no fault of the designer) refuse to compile (and transfer to
an arduino) from your computer.
It is rather a big ask for designers to remotely diagnose a fault or misconfiguration on your computer. The ideas that follow can hopefully help you a little.
Designers who create many of projects will find and often stick with whatever version of the IDE and set of libraries that works best for them. There have been many revisions of the Arduino Integrated Development Environment (IDE).
It would be nice if you could always rely on being able to use the latest version - but as we will discover, it isn't that simple. So your environment is very likely to be different to that of the computer where the sketch was created.
Which brings us to the second source of problems - the additional libraries that you need to install.
For instance, the IDE
knows nothing about the Si5351 until you add a supporting library - and
there is more than one because there is no controlling body to prevent
us all writing a library for the Si5351 - if we should want to.
You might find that if a sketch is written using one Si5351 library - but you install another, it may not work at all - or you may get some really odd error messages at compile time. Here is a useful starting point in understanding libraries. It discusses the "Library Manager" and its use with installing libraries. It also shows how to directly install a library "Importing a .zip Library" (from a source such as Github).
And then there is the combined problem of the IDE version and
Library. Some libraries may have been written with a particular version
of IDE in mind. The author of the library cannot be expected to know about IDE
changes going forward in time.
A later (or even earlier) version might not work with the IDE that you are using.
One designer that avoids all this installing of libraries is Pete N6QW and he will supply the library files along with his sketch. He will tell you to drop the library files in the same folder as the sketch.
Pete's sketches take advantage of the different ways that you can declare the use of a library.
Most times you will see something like this....
#include <LiquidCrystal_I2C.h>
#include <si5351.h>
This instructs the IDE to go find the two libraries from the libraries folder. If you should have two of the same name there it can end badly.
Pete N6QW often writes his sketches like this...
#include "LiquidCrystal_I2C.h"
#include "si5351.h"
What those quotation marks say is "get the libraries from the same folder as the sketch. This is further described here - but somewhere out there a better explanation probably exists. Anyway, this method can avoid compiler errors if you have an incompatible library already installed. It will go for the one that you put in the sketch folder (hopefully).
We would all benefit if the designer were to state which version of IDE they use and whose library they added, what version that library was (and where it came from). It would not hurt too if they were to record information as a comment in the sketch that they may make available. Some do that.
Then if you have this information you can go to Arduino.cc and download the specified IDE version. If it is the only IDE version you have installed into Windows - you may just be successful.
If you have another IDE version installed already you have a potential problem because multiple installations will often not play nicely together - that seems to be especially true in a Windows environment.
What would be nice is a way to have many IDE versions at hand to match the one that the designer used.
What follows is for computer owners competent in the messing around of things that could break.
Nick G8INE uses what is called "A portable version" in Windows. This is intended to be a standalone install and it only uses files inside the particular installation.
As I said earlier, Windows installations can be different from one PC to another and for some reason,
I cannot get portable versions to work on my study PC.
There is another way if you are a Linux user. Linux does not place all the configuration files in a big database like in Windows (it's called the Registry). The config files tend to be kept in separate folders. You can have a folder for every version of the IDE ever released and run the executable file in the "version folder" you require. But you may not want to abandon Windows.
You can use a "virtual machine" within your Windows PC and install linux to run inside Windows.
I use the free Oracle VirtualBox.
Another example for why I've used this: For a number of years I have used an old but perfectly legal copy of
Dreamweaver to create websites (like this one) and the only irritating
thing is that it ran like a pig under Windows 7 - and not at all
under Windows 10.
It was originally written to work under Windows XP. There is nothing
wrong with the software - and it is what I like to use. So virtual
machines can get around that problem.

Here you can see the control panel for Oracle. I have four virtual PC's. The lower two are Windows XP and Lubuntu (A lightweight Ubuntu Linux) - which is highlighted.
After clicking on the green start button at the top, a completely different operating system will execute within Windows 10.
The Arduino IDE in my Linux Virtual Machine.

The Window that is obscuring the rather splendid Grand Canal in Venice
is Lubuntu - with the Arduino IDE running inside that operating system - and not in
Windows.
I simply downloaded version 1.8.13 of the IDE (for Linux) and copied all the files into a folder called "1.8.13" all within the virtual machine.
I could do the same for version 1.8.12 and indeed have as many
completely independent installations of the IDE that I wish. This
strategy achieves the same objective as running portable versions within Windows.
So getting back to Charlie's VFO.
By some trial and error and by consulting older entries in Charlie's Blog Nick G8INE worked out that he could get the project to compile correctly by loading Charlie's code into a version of the IDE 1.8.13 and he also discovered that the Si5351 Library was from Jason Mildrum.
There is also another library to add which will support an LCD display
using an I2C interface, There are quite few of those and the one that
worked comes from here.
By using either the portable version for windows - or a Lubuntu
installation you can ensure that you have a completely clean
installation that is free from any previous libraries that may have
been added. This combination resulted in a successful compile.
One other item that popped up on Charlie's blog was some dialogue from builders who seemed to have found that the latest version of the LCD library required an addition to the sketch to properly set up the display. This was clearly not something needed in Charlie's original version.
Nick G8INE wrote: “its working I think, it turns out that you need the line lcd.init(); here";
// Initialize the display
lcd.init();
lcd.backlight();
lcd.noCursor();
Having added that to Charlie's sketch it all worked just fine.
All of which is a lesson that we need to give our ham radio designers a break - and not as some have done, write scathing emails because circumstances changed after they had made their design available.
I know one that just stopped sharing because of this lack of good manners and we are all poorer for that.
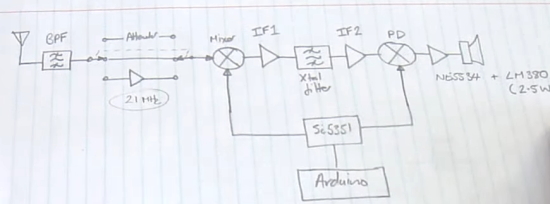
By way of explanation, here is a block diagram showing the Si5351 VFO having two frequency outputs. One is 9MHz and the other is the VFO frequency.
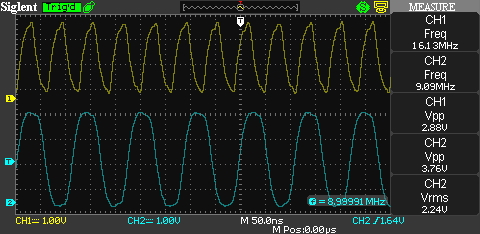
This oscilloscope snapshot shows those two outputs.
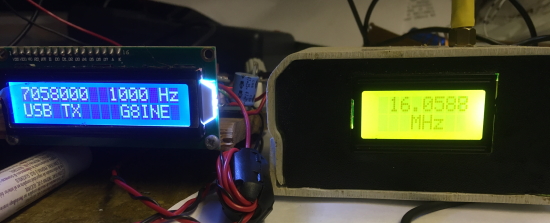
Finally, the display frequency versus the actual VFO frequency. The difference being the 9MHz I.F.
This VFO is part of the design of a complete SSB transceiver. Get information on the whole project from Charlie's Youtube Channel.